Last Updated on June 18, 2025
Transferring a tattoo stencil to the skin is a crucial step in the tattooing process. A well-applied stencil ensures that the tattoo design is accurately transferred, providing a clear guide for the tattoo artist. This article will walk you through the detailed steps and best practices for transferring a tattoo stencil to the skin.
Step 1: Clean the Area
The first step in transferring a tattoo stencil is to clean the area where the tattoo will be placed. This is essential for both hygiene and ensuring the stencil adheres properly.
- Use Soap: Begin by washing the area with a mild soap that also moisturizes the skin. This helps to remove any dirt, oils, and bacteria, reducing the risk of infection and making the skin smoother for shaving.
- Thorough Cleaning: Ensure you clean a larger area than the tattoo will cover to prevent bacteria from entering the tattooed area during the process.
Step 2: Shave the Area
Shaving the area is necessary to remove any hair that could interfere with the stencil application.
- Apply Shaving Foam: Use the foam soap applied in the previous step to shave the area. This prevents skin damage that can occur when shaving dry skin.
- Shave Beyond the Tattoo Area: Shave a larger area than the tattoo will cover to ensure the entire area is free of hair.
Step 3: Disinfect the Area
Disinfecting the skin is crucial to remove any remaining oils and to prepare the skin for the stencil.
- Use Alcohol: Apply rubbing alcohol to the area to disinfect it. This removes any natural oils or external agents that could prevent the stencil from adhering properly.
- Dry the Area: Wipe off any excess alcohol and ensure the skin is completely dry before proceeding to the next step.
Step 4: Apply Stencil Solution
The stencil solution is a key component in ensuring the stencil adheres properly to the skin.
- Even Application: Apply the stencil solution evenly over the tattoo area. There’s no need for a thick layer; just enough to cover the surface.
- Rub in Circular Motions: Help the solution sink into the skin by rubbing it in circular motions. This ensures even coverage and helps the solution become sticky, which is necessary for the stencil to adhere.
- Check for Stickiness: When the solution starts to feel sticky, the skin is ready for the stencil application.
Step 5: Apply the Stencil
Applying the stencil correctly is crucial for a clear and accurate transfer.
- Careful Placement: Carefully place the stencil onto the skin, pressing from the center outwards to avoid air bubbles and ensure full contact.
- Press and Hold: Lightly press down on the stencil and hold it for a few seconds to ensure it adheres properly.
- Rub Over the Stencil: Use a kitchen towel to rub over the stencil, ensuring it is completely dry before removing the stencil paper.
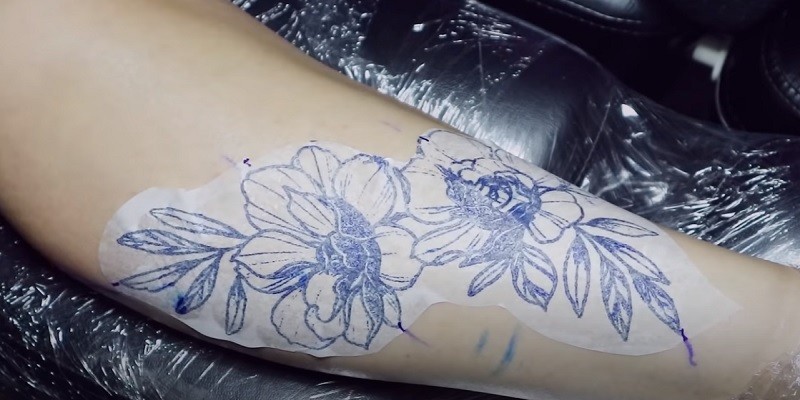
Step 6: Peel and Dry
Once the stencil is applied, it’s important to let it dry properly before starting the tattoo.
- Peel Off the Stencil Paper: Once the skin is dry enough, carefully peel off the stencil paper. The stencil should remain on the skin, providing a clear guide for the tattoo.
- Let It Dry: Allow the stencil to dry for 15-20 minutes before starting the tattoo. This ensures the stencil is fully set and won’t smudge during the tattooing process.
Tips and Tricks
Here are some additional tips and tricks to ensure a perfect stencil transfer:
- Use Markers for Placement: Use markers to ensure the stencil is placed correctly. This helps in aligning the stencil perfectly on the skin.
- Avoid Smudging: Keep your hands off the stencil as much as possible to avoid smudging. If the stencil smudges, it can be difficult to follow the design accurately.
- Multiple Stencils for Large Designs: For large tattoos, consider using multiple stencils. This can make the placement easier and improve the chances of a better transfer.
- Stencil for Portraits: When stenciling portraits or realistic designs, use dots instead of lines. This helps in achieving a more realistic look and prevents a cartoonish appearance.
Conclusion
Transferring a tattoo stencil to the skin is a meticulous process that requires attention to detail and proper technique. By following these steps and tips, you can ensure a clean, accurate stencil transfer, setting the stage for a successful tattoo. Whether you are a beginner or an experienced tattoo artist, mastering the art of stencil transfer is essential for creating high-quality tattoos.By adhering to these guidelines, you can enhance your tattooing skills and provide your clients with the best possible results. Remember, practice makes perfect, and with time and experience, you will become proficient in transferring tattoo stencils to the skin.
FAQs
How do you transfer a tattoo stencil to your skin at home?
To transfer a tattoo stencil to your skin at home, start by cleaning the area with green soap and shaving it to remove any hair. Apply a stencil transfer solution or a clear, acetone-free deodorant like Speed Stick to the area. Place the stencil face down on the skin, press firmly, and hold for a few seconds. Carefully peel off the stencil paper to reveal the design on your skin. Let it dry for a few minutes before starting the tattooing process.
Can you use Vaseline to transfer a tattoo stencil?
Vaseline is not typically used to transfer a tattoo stencil. Instead, it is applied after the stencil has been transferred to help protect the stencil lines during the tattooing process. Vaseline creates a barrier that prevents excess ink from smudging the stencil, making it easier to wipe off without disturbing the design. However, it is not effective for the initial transfer of the stencil to the skin.
What do tattoo artists use to transfer the stencil?
Tattoo artists commonly use stencil transfer solutions like Stencil Stuff, Electrum, or Spirit Stencil Transfer Cream to transfer stencils. These solutions help the stencil adhere to the skin and prevent smudging. Some artists also use acetone-free deodorants, such as Speed Stick, due to their glycerin content, which helps the stencil stick. Additionally, green soap is used to clean and prep the skin before applying the stencil.
How Do You Use Deodorant To Transfer Tattoo Stencils?
To use deodorant for transferring tattoo stencils, first clean and shave the area where the stencil will be applied. Apply a generous amount of clear, acetone-free deodorant like Speed Stick to the area. Place the stencil face down on the skin, press firmly, and hold for a few seconds. Carefully peel off the stencil paper to reveal the design. This method is cost-effective and works well for home applications.
How Can I Transfer A Tattoo Stencil Without Carbon Paper?
If you don’t have carbon paper, you can transfer a tattoo stencil using a ballpoint pen and parchment paper. Draw your design on regular paper, then place it face down on the skin. Apply a clear deodorant or a DIY stencil transfer solution made from water, witch hazel, and glycerin to the skin. Press the design firmly onto the skin and hold for a minute. Carefully peel off the paper to reveal the transferred design.
