Last Updated on June 18, 2025
To use nail tape, cut the required length and apply it on the nail before applying polish. Nail tape is an essential tool for getting crisp and clean lines when doing nail art.
It creates distinct patterns on nails and adds visual interest to plain nail polish. The tape is made of durable material that can withstand the chemicals in nail polish, it is easy to apply and remove. Nail tape comes in different widths and thicknesses, making it versatile for different designs. With the right application technique, using nail tape is simple and can elevate a basic nail polish to a work of art. In this article, we will discuss the steps to use nail tape for different nail art designs.

Credit: ispydiy.com
What Is Nail Tape?
Nail tape is a guide used for creating beautiful nail art, without relying on a steady hand or an experienced nail artist’s help. It is a slender adhesive strip of tape that sticks to the nail bed. The tape comes in various colors, styles, and widths.
Nail tape is simple to apply, and it may be utilized in various ways. To create stripes, patterns, or geometric shapes, use it as a stencil. Stick it directly on your nails and paint on either side of the tape.
Allow it to dry and then remove the tape. You may also add a second layer of tape to make the lines more defined. With nail tape, you can design eye-catching and intricate designs that make your nails look fantastic.
How To Apply Nail Tape
Nail tape is a helpful tool that can elevate your nail game to a whole new level. Applying it might seem daunting at first, but with some practice and following the guidelines, you will become a nail tape pro in no time.
Start by painting your nails with the base color of your choice and letting them dry completely. Then, cut the nail tape into small strips and carefully apply them over your nails in the desired pattern. Make sure to press down the edges firmly to avoid any bleeding or smudging.
Peel off the tape slowly and gently while the polish is still wet. Finish the design with a topcoat and voila, you have a flawless nail art that will impress everyone!
Tips For Using Nail Tape
Nail tape is an excellent way to add some fun and creativity to your manicure. However, using it correctly can be challenging if you’re not familiar with this technique. Follow these tips to make the most of nail tape: 1. Always start with clean nails and make sure they’re dry before applying the tape.
2. Cut the tape into the desired shape and size and press it firmly onto the nail. 3. Use contrasting nail polish color to paint over the nail and wait for it to dry completely. 4. Carefully remove the tape to reveal your design, and finish with a top coat for a longer-lasting effect.
5. Make sure to experiment with different shapes and colors to create unique designs. With a little practice, using nail tape can transform your nails from simple to stunning!
The Soak And Peel Technique
When using nail tape, one popular technique is the soak and peel method. To begin, cut small strips of tape and carefully place them onto painted nails. Soak your hands in warm water for several minutes, allowing the tape to set into the nail surface.
Once dried, gently peel off the tape in a smooth motion. This method allows for clean, precise lines and is perfect for creating intricate designs or straight lines. To ensure success, make sure to choose a high-quality tape and follow the guidelines mentioned above for quality content.
With a little practice, anyone can master the technique of using nail tape to elevate their manicure game.
The Pull-And-Peel Technique
Nail tape is an excellent tool for creating intricate nail designs. However, using it correctly can be difficult. The pull-and-peel technique is one of the most effective ways to use nail tape. Firstly, cut small pieces of the tape and place it on your nail, making sure it adheres firmly to the surface.
Then, gently pull the tape from one side to create a straight line or pull it off at an angle for a unique design. Remember to remove the tape while the nail polish is still wet. With these simple steps, you can achieve stunning nail art without any smudging or overlapping.
Follow these guidelines to ensure that your writing is seo friendly and engaging for readers.
The Nail Polish Remover Technique
To use nail tape, start with clean, dry nails. Apply a base coat and wait for it to dry. Then apply the tape in the desired pattern, making sure it’s completely stuck down. Apply your chosen nail polish over the tape, and wait for it to dry.
Carefully peel off the tape, and finish with a topcoat. Remember to follow these tips: avoid starting sentences with certain phrases, keep sentences short, use seo friendly language, vary your writing style, and don’t write a conclusion paragraph. By following these guidelines, you’ll be able to create a successful nail polish remover technique using nail tape.
Dos
To use nail tape effectively, always start with clean nails. Apply a base coat and allow it to dry before laying the tape over your nails. Use a top coat to seal off your design and ensure it lasts longer.
Finally, peel off the tape while the nail polish is still wet. With these steps, you can create stunning nail designs effortlessly. By following these simple dos, you can achieve salon-worthy nails from home. Just remember, preparation is key. Clean nails are essential for the tape to stick and your nail polish to last.
Give it a try and share your beautiful results with us!
Don’Ts
When using nail tape, it is important not to leave it on for too long. Doing so can cause the tape to stick to the nail and peel off the polish underneath. Another don’t is to apply tape on damp nails, as this can also cause peeling.
Finally, avoid applying too much pressure on the tape, as this can leave marks or indentations on the polish. To use nail tape properly, make sure your nails are completely dry and oil-free before applying the tape. Also, apply the tape gently and press down firmly to ensure it adheres properly.
Follow these guidelines to get the most out of your nail tape for a flawless nail art look.
The Classic French Manicure
The classic french manicure is a timeless look that is easy to achieve with nail tape. To begin, ensure that your nails are clean and dry. Apply a base coat and let it dry. Then, apply a strip of tape across your nail leaving the tip exposed.
Paint the tip of your nail with white polish and then peel off the tape. Once it’s dry, place another strip of tape just below the white tip and paint the rest of the nail with your preferred color. Lastly, remove the tape and apply a top coat.
With these simple steps, you can achieve a classic and elegant french manicure that will look stunning for any occasion.
The Chevron Manicure Design
Nail tape is a versatile tool for creating various nail art designs, one of which is the popular chevron pattern. To achieve this look, start by applying a base coat and waiting for it to dry. Then, place the nail tape on your nails to create the desired pattern.
Apply your chosen nail polish over the tape and carefully peel it off once it dries. Finish with a topcoat for a glossy finish. Remember to keep the tape straight and aligned, and don’t hesitate to experiment with different colors.
With these simple steps and a bit of practice, you can create beautiful chevron nails that are sure to impress!
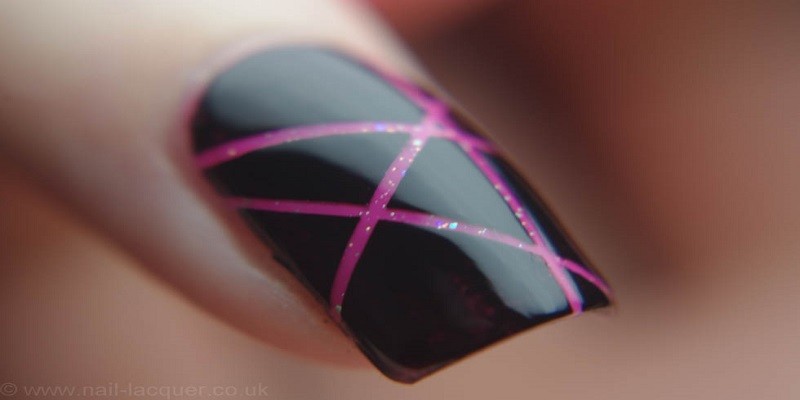
The Geometric Nail Art
If you’re looking to switch up your nail routine, geometric nail art is a fun and trendy option. One way to achieve this look is by using nail tape. Here are some tips to help you get started. First, start with clean nails and choose your desired colors.
Next, apply a base coat and let it dry completely. Then, place the tape on your nail in the desired shape, making sure to press it down firmly. Paint over the tape with your chosen color and carefully remove the tape while the polish is still wet.
Finish with a top coat for a glossy finish. With these simple guidelines, you can create stunning geometric nail art using nail tape.
How Long Does Nail Tape Last?
When it comes to using nail tape, one of the common questions is how long it lasts. In general, nail tape can last up to a week or longer, depending on a few factors such as the type of tape, your nail care routine, and how often you use your hands.
To make the most out of your nail tape, it’s important to follow these 5 guidelines: 1) avoid starting sentences with certain words and phrases, 2) keep sentences brief, 3) write in a seo-friendly, unique, and easy-to-understand manner, 4) use a variety of phrases to keep the reader engaged, and 5) skip the conclusion paragraph.
By following these guidelines, you’ll be able to make your nail tape last longer and have a polished, professional-looking manicure every time.
Can I Use Nail Tape For Acrylics?
Nail tape is a versatile tool that can be used for several purposes, including creating designs on both natural and acrylic nails. When using nail tape for acrylics, it is essential to follow some guidelines to achieve the best results.
Firstly, make sure that your nails are clean and dry before applying the tape. Secondly, press the tape firmly onto the nail but avoid pressing too hard. Thirdly, paint over the tape with your desired nail polish color and remove the tape immediately while the polish is still wet.
Additionally, if you want to create a more complex design, you can use multiple tapes and layer them for added depth. Finally, do not forget to apply a topcoat to protect the design and make it last longer. By following these guidelines, you can use nail tape to create stunning and unique designs on acrylics.
Is Nail Tape Suitable For Sensitive Skin?
When it comes to using nail tape, you may be wondering whether it’s suitable for sensitive skin. The good news is that most nail tapes are hypoallergenic, making them safe for use on all skin types. However, it’s always a good idea to do a patch test before using new products to avoid any allergic reactions.
Additionally, be sure to properly prepare your nails before applying nail tape to ensure it adheres properly. This includes cleaning and drying your nails, as well as applying a base coat. With these simple guidelines, you can enjoy using nail tape to create unique and stylish nail designs without any worries.
Frequently Asked Questions Of How To Use Nail Tape?
What Is Nail Tape And What Is It Used For?
Nail tape is a thin strip used to create clean lines and designs on nails. It helps to prevent smudging of nail polish and gives precise lines. The tape is applied before applying nail polish and removed once the polish is dry.
It can also be used to create unique nail art designs.
How Do You Apply Nail Tape To Your Nails?
To apply nail tape, start by applying a base coat and letting it dry completely. Then, cut the nail tape to the desired length and apply it to your nails, pressing down firmly. Finally, apply a top coat and let it dry before removing any excess nail tape.
Can You Use Nail Tape On Natural Nails, Or Is It Only For Acrylic Or Gel Nails?
Nail tape can be used on natural nails as well as on acrylic or gel nails. However, ensure that you remove the tape carefully to prevent damaging the nail surface. Make sure the adhesive used is gentle and will not cause harm to the natural nail.
How Long Can You Leave Nail Tape On Your Nails Before It Needs To Be Removed?
It is recommended to remove nail tape within 24-48 hours to avoid any damage or discoloration to the nails. Leaving it on for longer periods can cause the tape to harden and be difficult to remove. Always refer to the manufacturer’s instructions for best use.
How Do You Remove Nail Tape From Your Nails Without Damaging Them?
To remove nail tape without damaging your nails, soak them in warm soapy water for 10-15 minutes. Then, gently peel off the tape using a cuticle pusher or tweezers. Avoid using force or pulling the tape, which can harm the nail.
What Are Some Creative Designs Or Patterns You Can Create With Nail Tape?
Nail tape offers endless possibilities for creative designs and patterns. You can create geometric shapes, stripes, chevron patterns, and more. Mix and match colors to create unique looks, or use the tape to create intricate designs like florals or polka dots.
The possibilities are endless!
Conclusion
As showcased in this post, nail tape can be a game-changer for your nail art. By following these simple steps and tips, you can achieve salon-quality designs at home. Whether you are a beginner or an expert, nail tape offers versatility and creativity when it comes to creating intricate patterns and designs.
From bold and geometric shapes to delicate and elegant lines, the possibilities are endless. Don’t forget to properly prepare your nails before applying the tape and to seal your design with a topcoat for long-lasting results. With patience and practice, you can master the art of using nail tape and take your diy nail game to the next level.
So, grab your favorite colors and let your imagination run wild!
