Last Updated on June 18, 2025
I Tip hair extensions are a popular choice for those looking to add length and volume to their natural hair. To install I Tip hair extensions, you will need some supplies such as micro beads, threader tool, extension pliers and scissors. Begin by washing your natural hair with shampoo and conditioner.
Then use the threader tool to pull small sections of your own hair through the loop at the top of each extension strand. Next, take one bead in between the two strands of your own hair before squeezing it shut with an extension plier or tweezer. Repeat this process until all of your desired extensions have been added.
Finally cut off any excess strands that may be hanging down from the bottom and style as desired!
- Step 1: Purchase the I Tip hair extensions in the desired length and color. Make sure to buy enough strands to cover your entire head, as well as any extra pieces you may need for touch-ups or styling.
- Step 2: Gather all of your tools that will be needed for installation. This includes a rat tail comb, scissors, hair clips and an applicator tool specifically designed for applying I Tip extensions.
- Step 3: Divide your natural hair into small sections using the rat tail comb and secure each section with a clip. This will make it easier to apply the extensions without tangling them together with other strands of hair.
- Step 4: Take one strand of extension hairs and separate out about 10 individual hairs from it using scissors. Place these individual strands between two fingers on one hand while holding onto the end of the bundle with your other hand.
- Step 5 : Insert this bundle into the tube part of the applicator tool ensuring that at least 2 inches (5 cm) is left outside of it so they can easily be attached later on after being applied to your own hair.
- Step 6 : Insert this tube containing extension hairs under one section of natural hair very close to scalp level and press down firmly until there is no gap between them.
- Step 7 : Keep repeating steps 4 through 6 until all desired areas are covered by I Tip Hair Extensions.
I-Tip Hair Extensions for Black Hair
I-Tip hair extensions are a great choice for black hair. They are easy to install, lightweight and won’t damage your natural locks. The small metal tipped strands of pre-bonded human hair can be applied with heat or cold fusion methods that don’t require any tools or glue, making them perfect for people who want an up close and personal look without the hassle of traditional extension application.
I-Tip extensions come in a variety colors from jet black to blonde so you can find one that matches your natural shade perfectly. With proper care, these extensions will last up to six months giving you plenty of time to enjoy beautiful long locks before they need replacing!

Credit: lcvickerssalon.com
How are I-Tip Extensions Applied?
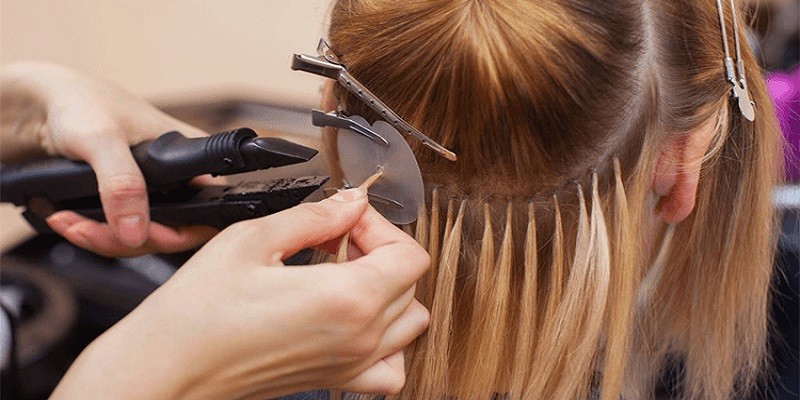
I-tip extensions are a great way to add volume, length and color without having to use chemical treatments. They are applied strand by strand using tiny copper beads that secure the hair in place. The process starts with making sure the client has healthy natural hair before applying the extensions.
A specialized tool is used to attach small sections of I-tip extensions onto the natural strands of hair in a specific pattern, typically starting at the back of the head and working towards the front. The specialist will then carefully insert each extension one at a time into individual pieces of existing natural hair, with as little stress on your scalp as possible. Once all of the extensions have been securely attached, they can be trimmed for style or cut into layers for an even more natural looking finish if desired.
With proper aftercare and maintenance, I-tip extensions can last up to six months or longer depending on how quickly you’re able to grow out your own hair!
How Long Does It Take to Install I-Tip Hair Extensions?
Installing I-tip hair extensions is a relatively simple process that can be done in the comfort of your own home. Depending on the length and volume of hair you’re working with, installation typically takes anywhere between one to two hours. Before starting, make sure you have all the tools necessary for the job – such as micro link beads, threader tool, glue gun and clips.
The first step is to section off your hair into small sections and apply threading loop on each section before sliding an individual strand of extension through it and fastening it securely with bead at its root. After applying all strands onto your natural hair, use a flat iron or hot curling wand to blend them together seamlessly with your real locks before styling as desired. With proper care and maintenance over time, these extensions can last up to 6 months or longer!
What is the Difference between K Tip And I-Tip?
K-tip and I-tip extensions are two of the most popular methods used in hair extension application. K-tips are pre-tipped with a keratin bond which can be heated to a high temperature, allowing them to attach directly to your natural hair. This method is designed for longer lasting bonds that typically last 2 – 3 months before needing readjustment or removal.
On the other hand, I-tips involve no heat and require no glue or chemicals; instead they use small metal beads (or micro rings) attached at the end of each strand of hair extension. This type of application is much gentler on your natural locks but tends to have shorter life span than K tips and needs more regular maintenance like tightening at least once every six weeks.
How Long Does I-Tip Hair Extensions Last?
I-tip hair extensions are an increasingly popular way to add volume and length to your own natural hair. But how long do these extensions last? The answer depends on a few factors, such as the quality of the extension, how well you care for them and lifestyle habits that may affect their longevity.
Generally speaking though, I-tip hair extensions will last anywhere from three to six months with proper maintenance and care. To ensure they remain in good condition for longer, be sure to cleanse your scalp regularly with gentle shampoo and conditioner specifically formulated for use with extensions. Additionally, try sleeping on a satin pillowcase or wearing a silk scarf around your head at night when you sleep; this helps minimize tangling which can lead to premature wear and tear of the strands over time.
Finally, avoid using harsh styling tools like curling irons or blow dryers excessively as this can also cause damage leading to reduced life span of the extension strands.
I-tip Hair Extensions Tutorial – Full Install by DreamCatchers Head Educator Dorothy
Conclusion
Installing I Tip hair extensions can be a great way to instantly add length and volume to your hair. Though it may seem intimidating at first, with the right tools and supplies, anyone can easily install these extensions with minimal effort. With the help of this guide, you should now have the knowledge and confidence needed to successfully apply I Tip hair extensions on your own!
